Mudanças entre as edições de "Dns com IP próprio na Godaddy"
De Wiki Integrator do Brasil
| (4 edições intermediárias de um usuário não apresentadas) | |||
| Linha 1: | Linha 1: | ||
| + | [[File:Banner-wiki-promocoes.gif|center| 700px||border|link=https://www.integrator.com.br/plano-hospedagem-promocionais|Planos promocionais|]] | ||
| − | 1) Entrar em | + | |
| + | ---- | ||
| + | ---- | ||
| + | ---- | ||
| + | |||
| + | 1) Entrar em http://www.godaddy.com | ||
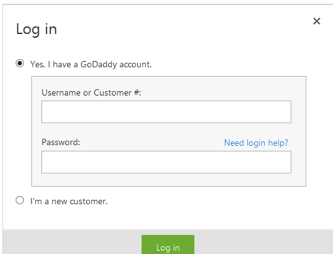
2) Clicar em '''Log in''' | 2) Clicar em '''Log in''' | ||
| − | [[File:2013-11-26_15-45-04.png|frame|none|alt=Alt text]] | + | [[File:2013-11-26_15-45-04.png|frame|none|alt=Alt text|link=]] |
3) Digitar o seu '''Login''' e '''Senha''' | 3) Digitar o seu '''Login''' e '''Senha''' | ||
| − | [[File:2013-11-26_15-45-16.png|frame|none|alt=Alt text]] | + | [[File:2013-11-26_15-45-16.png|frame|none|alt=Alt text|link=]] |
4) Clicar em '''Launch''' | 4) Clicar em '''Launch''' | ||
| − | [[File:2013-11-26_15-45-38.png|frame|none|alt=Alt text]] | + | [[File:2013-11-26_15-45-38.png|frame|none|alt=Alt text|link=]] |
5) Escolher o domínio que deseja incluir; | 5) Escolher o domínio que deseja incluir; | ||
| − | [[File:2013-11-26_15-45-46.png|frame|none|alt=Alt text]] | + | [[File:2013-11-26_15-45-46.png|frame|none|alt=Alt text|link=]] |
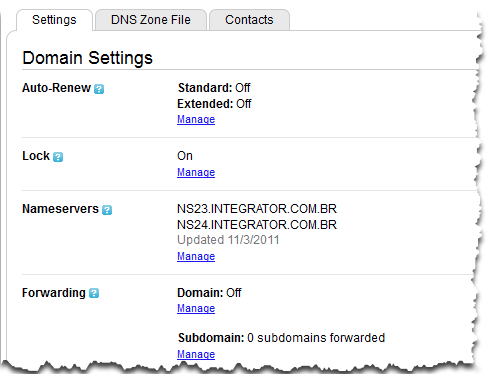
6) Clicar em '''Manage''' no Host Names | 6) Clicar em '''Manage''' no Host Names | ||
| − | [[File:2013-11-26_15-45-54.png|frame|none|alt=Alt text]] | + | [[File:2013-11-26_15-45-54.png|frame|none|alt=Alt text|link=]] |
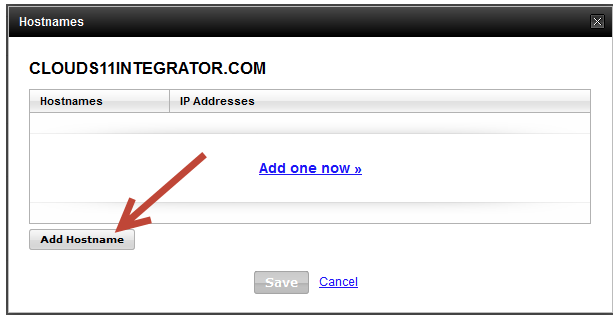
7) Clicar em '''Add Hostname''' | 7) Clicar em '''Add Hostname''' | ||
| − | [[File:2013-11-26_15-46-03.png|frame|none|alt=Alt text]] | + | [[File:2013-11-26_15-46-03.png|frame|none|alt=Alt text|link=]] |
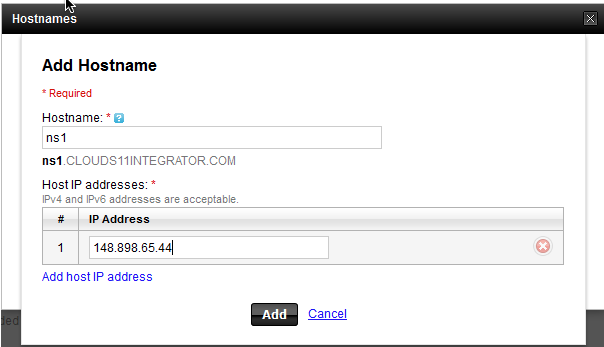
8) Inserir o '''Hostname''' e o '''Ip''' | 8) Inserir o '''Hostname''' e o '''Ip''' | ||
| − | [[File:2013-11-26_15-46-15.png|frame|none|alt=Alt text]] | + | [[File:2013-11-26_15-46-15.png|frame|none|alt=Alt text|link=]] |
9) Clicar em '''ADD''' para finalizar. | 9) Clicar em '''ADD''' para finalizar. | ||
[[Categoria:TUTORIAIS]] | [[Categoria:TUTORIAIS]] | ||
Edição atual tal como às 19h15min de 28 de agosto de 2018

1) Entrar em http://www.godaddy.com
2) Clicar em Log in

3) Digitar o seu Login e Senha
4) Clicar em Launch

5) Escolher o domínio que deseja incluir;
6) Clicar em Manage no Host Names
7) Clicar em Add Hostname
8) Inserir o Hostname e o Ip
9) Clicar em ADD para finalizar.